How to install a dog house heater
Mounting a wall heater in a dog house takes a drill and some care with the cord. This guide goes from choosing the wall to the first test run, with the safety checks built into each step.
Before you start
Read the heater’s manual first, because clearance and mounting rules differ between models. Then check that the house is ready, since a heater can’t fix a drafty shell or a wet floor.
Our guide on insulating the dog house first covers the groundwork. If you are unsure the heater is the right size, our guide to watts and house size settles it in a few minutes.
What you need
- The heater, its screws or bracket, and the manual
- A drill with a wood bit, plus a larger bit or hole saw for the cord exit
- A tape measure and a pencil
- A metal or hard plastic conduit, or a chew guard, long enough to cover the cord outside
- A GFCI-protected outdoor outlet, plus an outdoor-rated cord only if the heater’s own cord can’t reach
- Cable clips rated for outdoor use
Step 1: pick the wall
Mount the heater on a side wall away from the door, so warm air fills the sleeping area instead of leaking out. The Akoma Hound Heater fixes to a side wall with four screws or bolts, and Akoma sells a separate bracket for igloo-style houses.
Choose the wall closest to the outlet, so the cord run stays short. The back corner opposite the door often works well, as long as you can keep the bedding clear of it.
Step 2: set the height
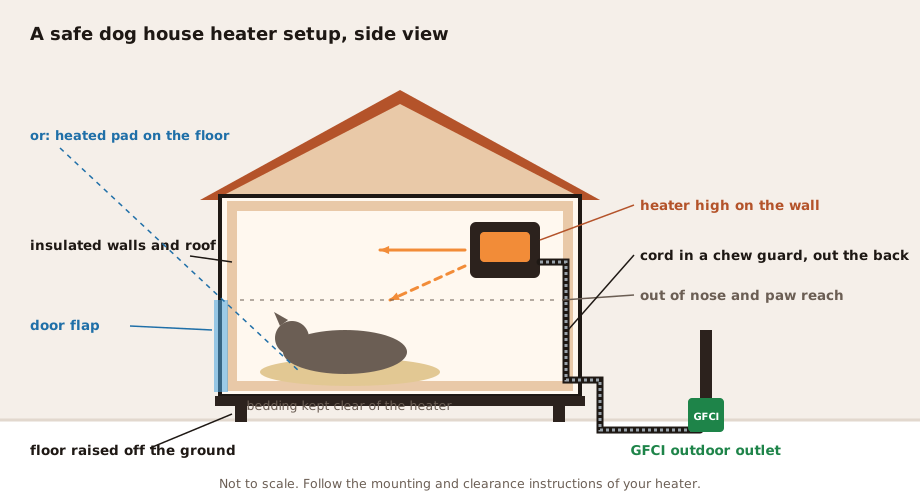
The heater has to sit above your dog’s reach, standing or rearing up, while still warming the space where it lies. Dreyoo’s listing asks for its heater to sit higher than the pet, and each manual gives its own clearances.
In a low house this can be tight. If the heater would end up at nose height, a heated pad is the safer choice, and the setup diagram below shows the idea.
Step 3: drill the cord exit
Drill the hole for the cord close to the heater, through the back or side wall, never through the floor where water collects. Make it only as big as the plug needs, then seal the gap around the cord against drafts.
Smooth the edges of the hole so they can’t cut the cord. Plan the outside route before you drill, so the cord drops straight into its conduit.
Step 4: mount the heater
Hold the heater or its bracket against the wall, mark the holes and drill pilot holes. Fix it with the supplied screws, then push on it firmly to check that it doesn’t wobble.
The Dreyoo hangs on a separate mounting bracket, and the Briidea mounts with screws. In a thin plastic house, use bolts with washers through the wall rather than screws that can pull out.
Step 5: route and guard the cord
Feed the cord out through the hole and into a metal or hard conduit along the outside wall. Clip it down so no loop hangs free, and keep it off the ground on the way to the outlet.
Inside, no part of the cord should be within reach. Our guide to GFCI outlets, cords and chew guards covers extension cord gauge and weatherproof covers in detail.
Step 6: plug in and set the thermostat
Plug into a GFCI-protected outdoor outlet, after testing the outlet with its test and reset buttons. If you need an extension, use one outdoor-rated cord marked “W”, plugged in once, with the connection kept out of snow.
Set the thermostat low to start. On the Hound Heater a retailer puts the medium setting at about 45 to 50 °F, while the Dreyoo’s fixed thermostat kicks in below 68 °F and cuts out above 78.8 °F.
The Briidea lets you pick anywhere from 32 to 122 °F, and the TURBRO is set through its app. Start low and raise the setting only if the house stays cold.
Step 7: test run and daily check
Run the heater with the door open for an hour while you stay nearby. Feel the air at the height where your dog lies, and make sure the thermostat cycles off once the house is warm.
Then add the bedding, keeping straw well clear of the heater. Check the setup every day, along with your dog, as our nine safety rules lay out.
Installing a heated pad instead
A pad needs no drilling inside, only a hole for the cord. Lay it on the side of the floor away from the door, leaving bare floor beside it so your dog can move off when it gets warm.
Run the cord straight out through the wall and into the same kind of conduit you would use for a heater. The Lectro-Kennel’s cord is steel-wrapped, but a guard outside still keeps it out of reach.
Put a thin layer of straw around the pad rather than piling it on top. The pad’s fleece cover goes on first, and it comes off for washing.
Common mistakes
- Mounting the heater at nose height to warm the floor
- Leaving a loop of cord inside the house
- Running the cord through the floor or along wet ground
- Daisy-chaining extension cords or adding a power strip
- Packing straw up against the grille
- Setting the thermostat to maximum on the first night
To compare the heaters before you drill, see all our dog house heater picks, or jump to the six products side by side. The homepage tips before you buy cover cord length and mounting.
A small heater that mounts in minutes
The Dreyoo 600/300W measures 6.7 × 6.3 × 4.7 in, hangs on its own bracket and comes with a 6 ft steel-wrapped anti-bite cord. Its thermostat is fixed, so you can’t choose the temperature, as our Dreyoo review explains.
